Buta no Kakuni (Japanese Braised Pork Belly with Soy and Sake)
Buta no kakuni (豚の角煮) — Japanese braised pork belly — is the kind of dish that quietly justifies an entire afternoon in the kitchen. Thick cubes of pork belly, simmered first in rice water to render the fat and then slowly braised in a soy-and-sake glaze until they collapse under the weight of a chopstick. The flavour is deep, gentle, slightly sweet, and the texture is the kind of melt-in-your-mouth tender that you usually only get at a serious Japanese restaurant. Once you’ve made kakuni at home, you’ll understand why it’s a celebration dish in Japan — and also why it’s so much better made over a few unhurried hours than rushed.
The traditional method has three stages: sear, simmer with rice (to render the fat), then braise in seasoning. The whole thing takes 2–3 hours, but almost none of it is active work. I usually start in the late morning, do other things while the pork simmers, and have kakuni ready for dinner with very little stress. The recipe below follows a classic Kikkoman-style approach.
What Makes Japanese Kakuni Different
Chinese red-braised pork (hong shao rou) and Japanese kakuni share an ancestor, but they end up tasting very different. Chinese versions tend to use rock sugar, star anise, and a heavier soy glaze. Japanese kakuni is lighter, cleaner, and more aromatic — soy sauce, sake, sugar, ginger, garlic, and the green parts of a scallion are the only seasonings, and a key step is pre-boiling the pork with rice (or rice water) to render off as much excess fat as possible.
The result is a piece of pork belly that’s deeply savoury but not heavy. You can eat several cubes without feeling overwhelmed by fat, which is the whole point.
Ingredients
Serves 4–6
| Ingredient | Amount |
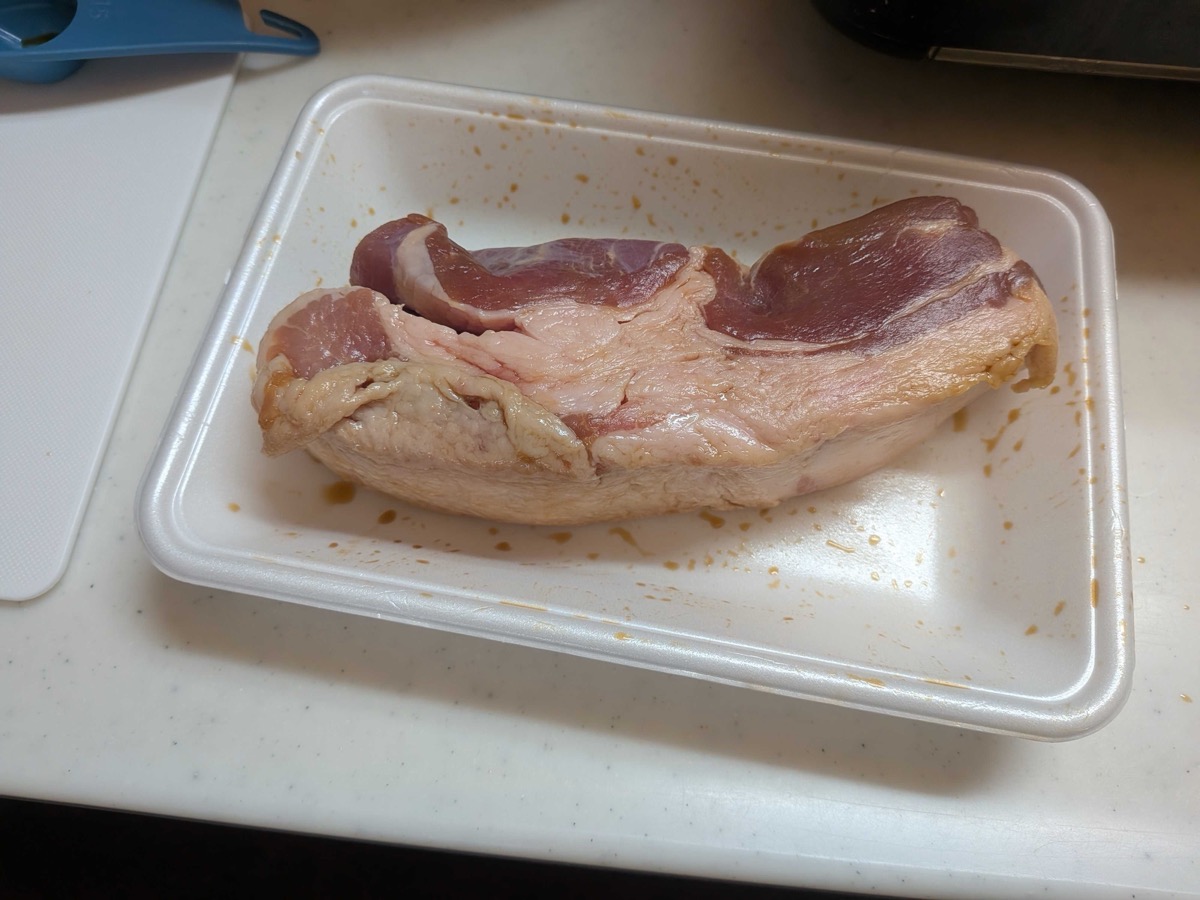
| Pork belly, in one block (skin-on or off) | 900–1200g (2–2.6 lb) |
| Soy sauce (for the initial rub) | 2 tbsp |
| Uncooked white rice (for pre-boil) | 5 tbsp |
| Water (for pre-boil) | About 2 litres |
| Garlic cloves, peeled | 2 |
| Ginger, sliced | 2 thumb-sized pieces |
| Scallion, green parts | 5cm (2 inches) |
| Soy sauce (for braising) | 80ml (1/3 cup) |
| Sake (for braising) | 120ml (1/2 cup) |
| Sugar (for braising) | 6–7 tbsp |
| Water (for braising) | 2.5 cups (600ml) |
| Soft-boiled eggs (optional, to serve) | 4–6 |
For the pantry staples:
- 👉 Japanese soy sauce on Amazon
- 👉 Japanese otoshibuta (drop lid) on Amazon — makes a real difference for even braising
Step 1: Rub with Soy Sauce and Rest at Room Temperature
This is the secret first step from the classic Kikkoman method, and it makes a real difference. Take the pork belly out of the package, place it in a tray, and rub 2 tablespoons of soy sauce all over the surface, massaging it into the meat. Then leave it at room temperature for 30 to 60 minutes.
Why does this matter? Naturally-brewed Japanese soy sauce contains enzymes that gently break down the connective tissue in meat — the same effect you’d get from a long marinade, accelerated. The pork also picks up a subtle base seasoning all the way through, not just on the surface. By the time you start cooking, the meat is already on its way to becoming the kind of tender you want for kakuni.
After the rest, pat the surface of the pork completely dry with paper towels. Dry pork browns properly; wet pork steams and goes grey.

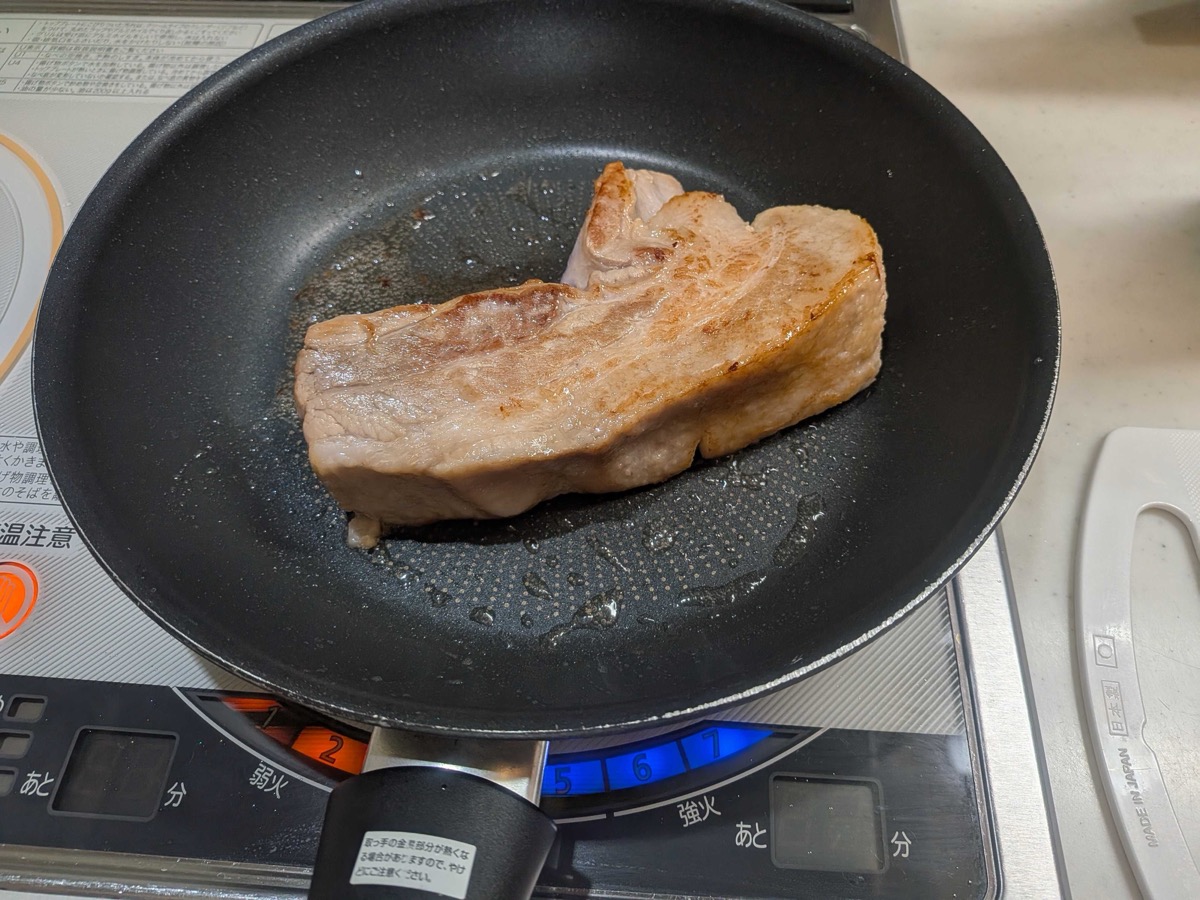
Step 2: Sear the Pork on All Sides
Heat a dry frying pan over medium-high heat — no oil needed, the pork’s own fat will render out. Place the pork fat-side down first and let it cook for about 2 minutes, until it turns golden brown. Then turn the block onto each of the other sides and sear for about 1 minute each.
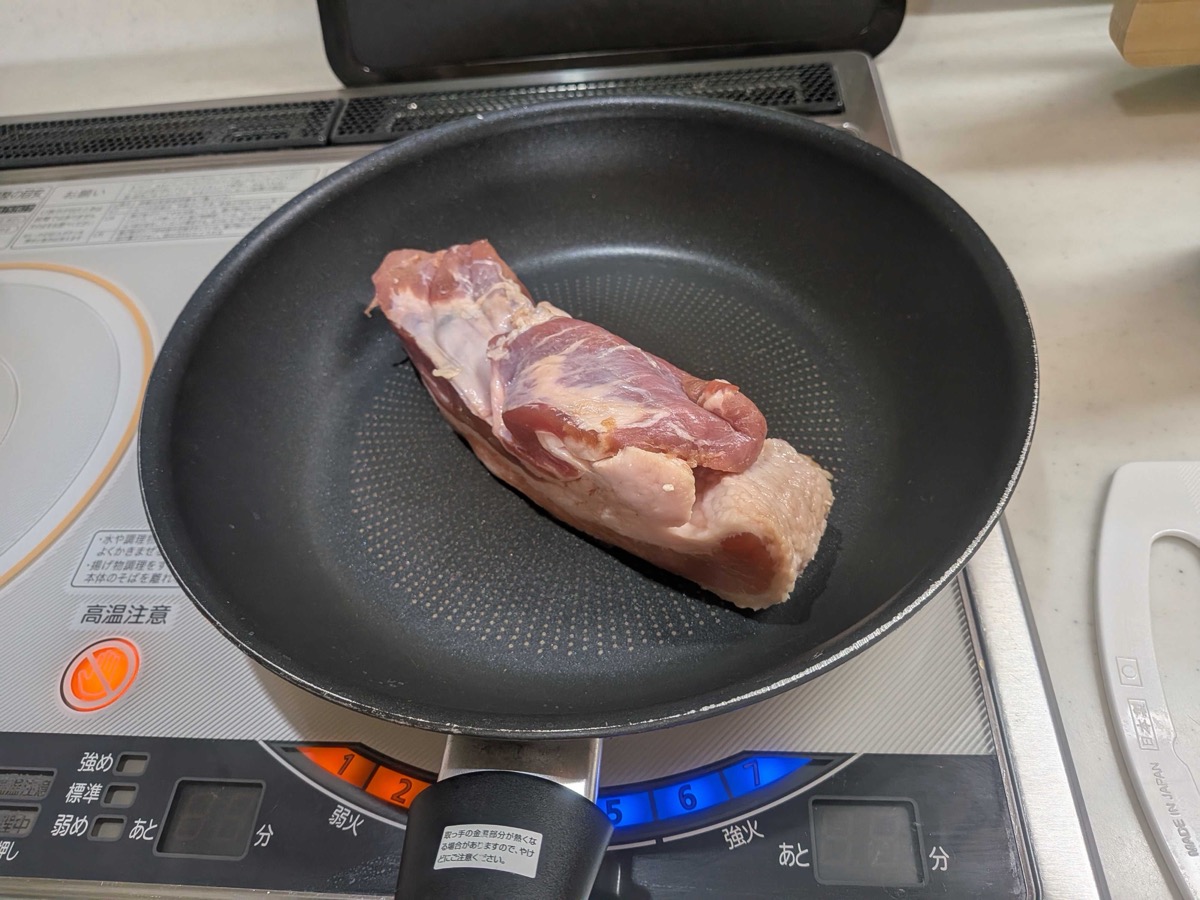
You want each side to look properly golden brown, not just pale. This colour will translate into deeper flavour and a better-looking finished dish.
Step 3: Pre-Boil with Rice for 60 Minutes
This is the step that separates good kakuni from great kakuni. Put the seared pork into a deep pot. Add about 2 litres of water (enough to cover the pork by a generous margin) and 5 tablespoons of uncooked white rice. Yes, just regular short-grain rice — the starch the rice releases helps draw fat and impurities out of the pork.
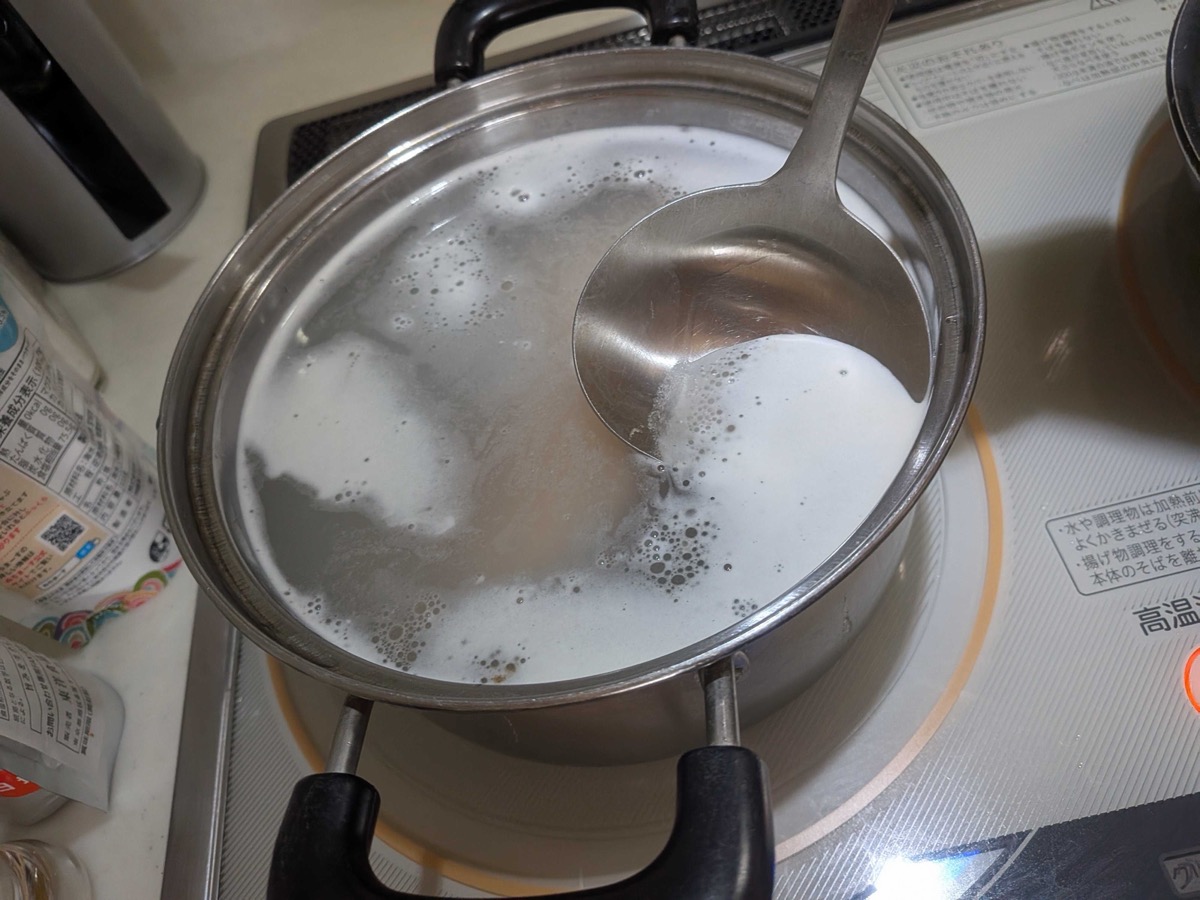
Bring to a boil, then reduce to a gentle simmer and cook uncovered for 60 minutes. The water will turn milky white — that’s exactly right, it’s the starch and rendered fat coming out.
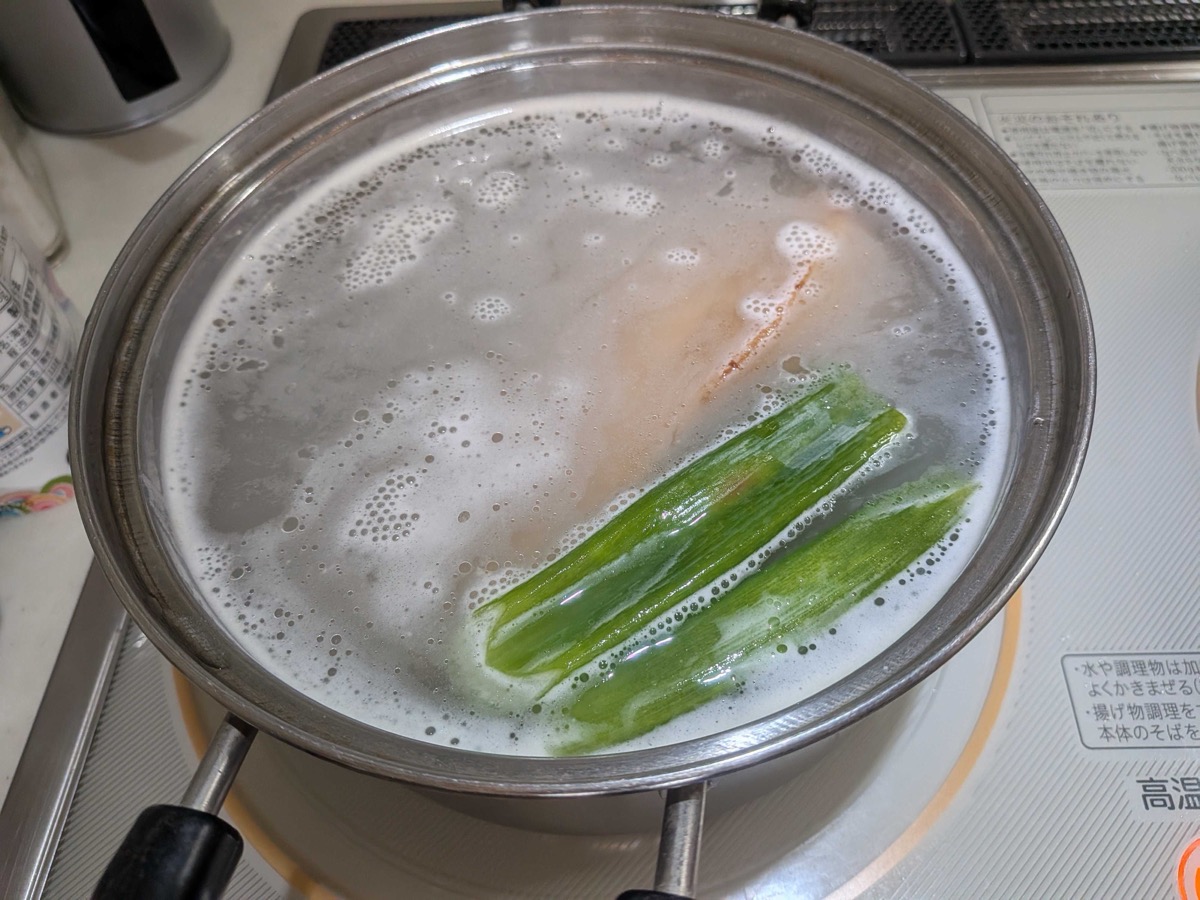
Optional but recommended: after 30 minutes, add the green parts of a scallion (5cm) to the water. They give the pork a subtle, fresh aromatic note.

Step 4: Cool, Rinse, and Cut into Cubes
Turn off the heat and let the pork rest in its cooking water for at least 90 minutes (up to 2 hours). This long cooling period continues to break down the connective tissue without any active cooking — it’s where a lot of the famous melt-in-your-mouth tenderness develops.
When the pork is cool enough to handle, lift it out of the water. Rinse off any sticky residue under cool running water. Place on a cutting board and cut the block into roughly 4cm (1.5 inch) cubes.
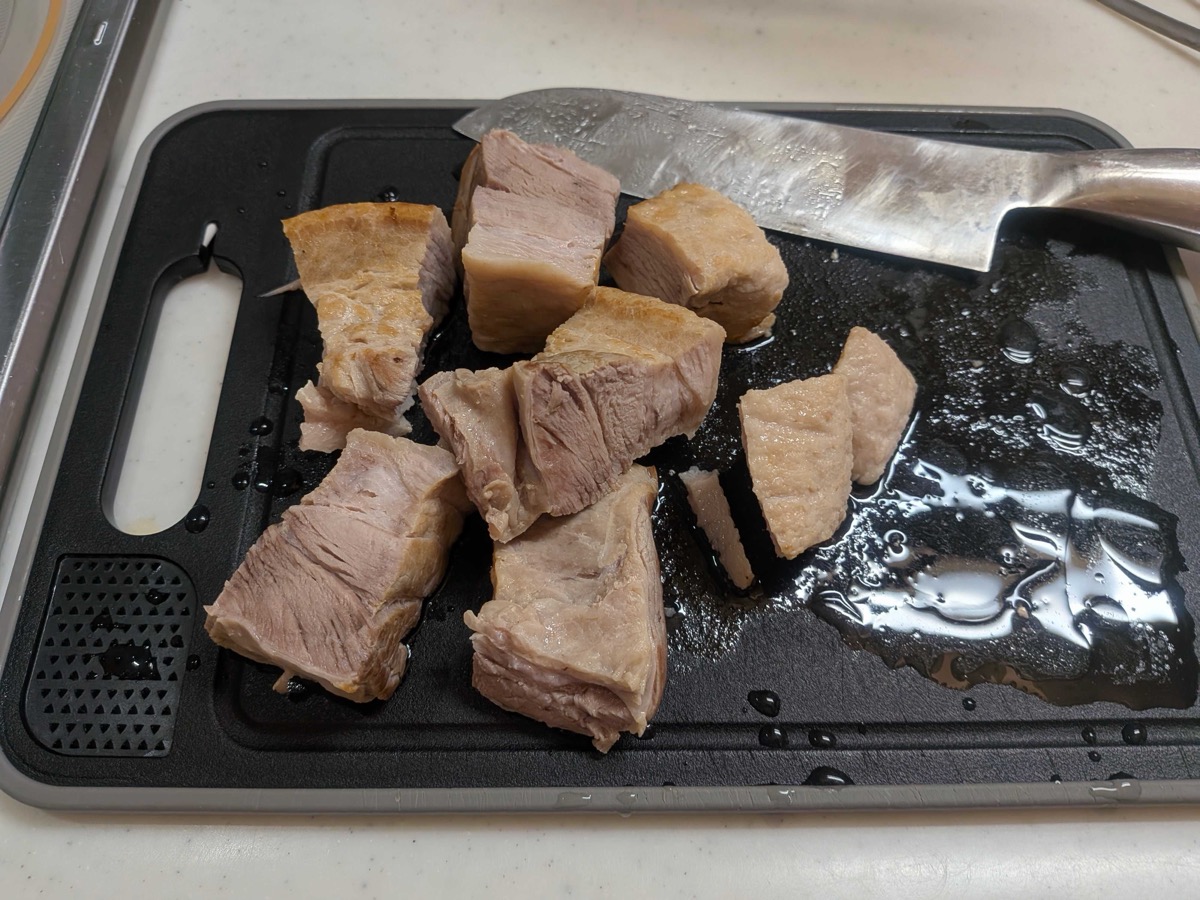
Slice the ginger thinly and peel the garlic cloves; set aside for the braise.
Step 5: Braise in Soy Sauce, Sake, and Sugar
In a clean pot (a heavy-bottomed one works best, or a Japanese-style small braising pot), combine the soy sauce, sake, and sugar. Bring to a boil and let it bubble for 1–2 minutes to cook off the raw alcohol from the sake.
Add the pork cubes and stir to coat. Simmer for 4–5 minutes to glaze each surface in the first concentrated seasoning. This initial reduction is what gives kakuni its glossy mahogany colour.
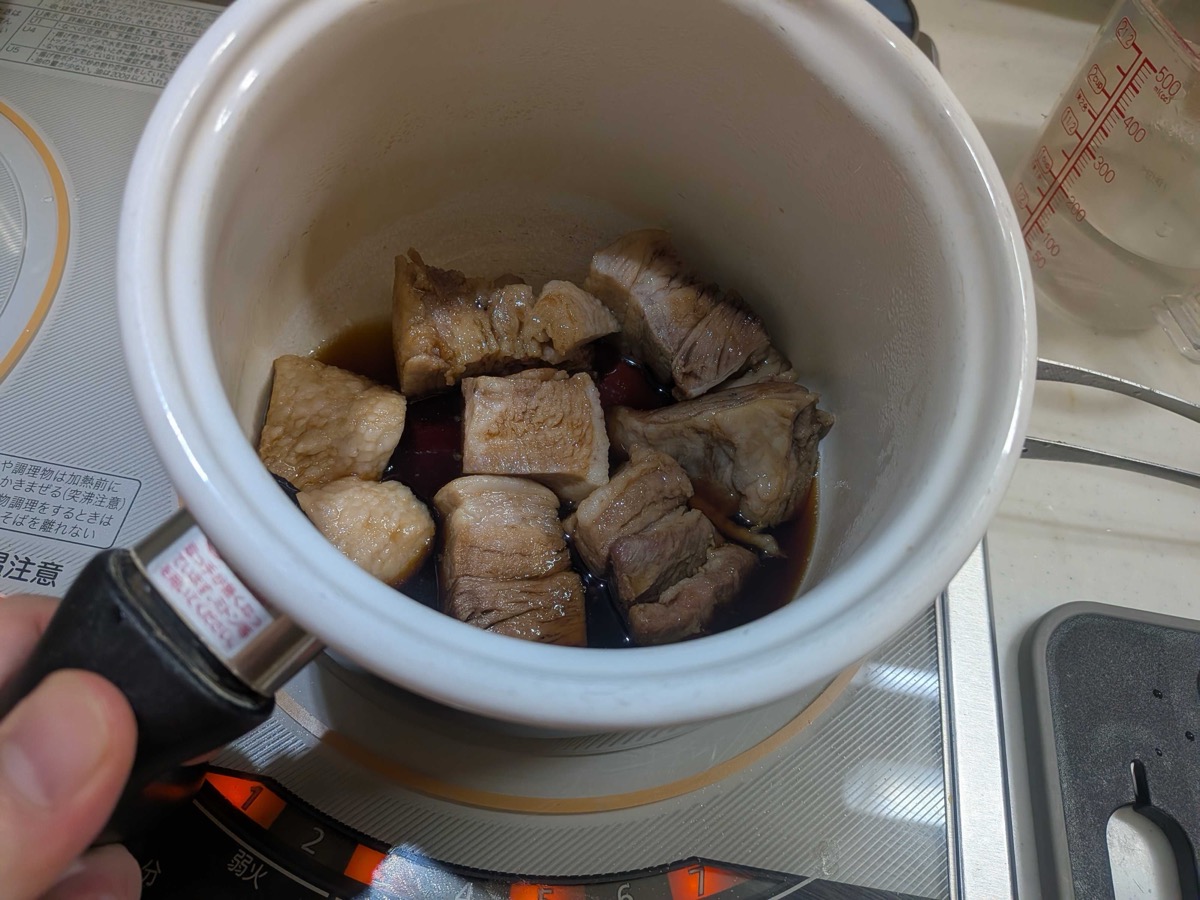
Now add the water, sliced ginger, and peeled garlic cloves. Bring back to a simmer.
Step 6: Slow Simmer for 40–50 Minutes
Place a drop lid (otoshibuta) directly on the surface of the simmering liquid — or improvise one with a sheet of parchment paper or aluminum foil cut to fit inside the pot. The drop lid keeps the pork submerged and helps the seasoning circulate evenly while the liquid reduces.
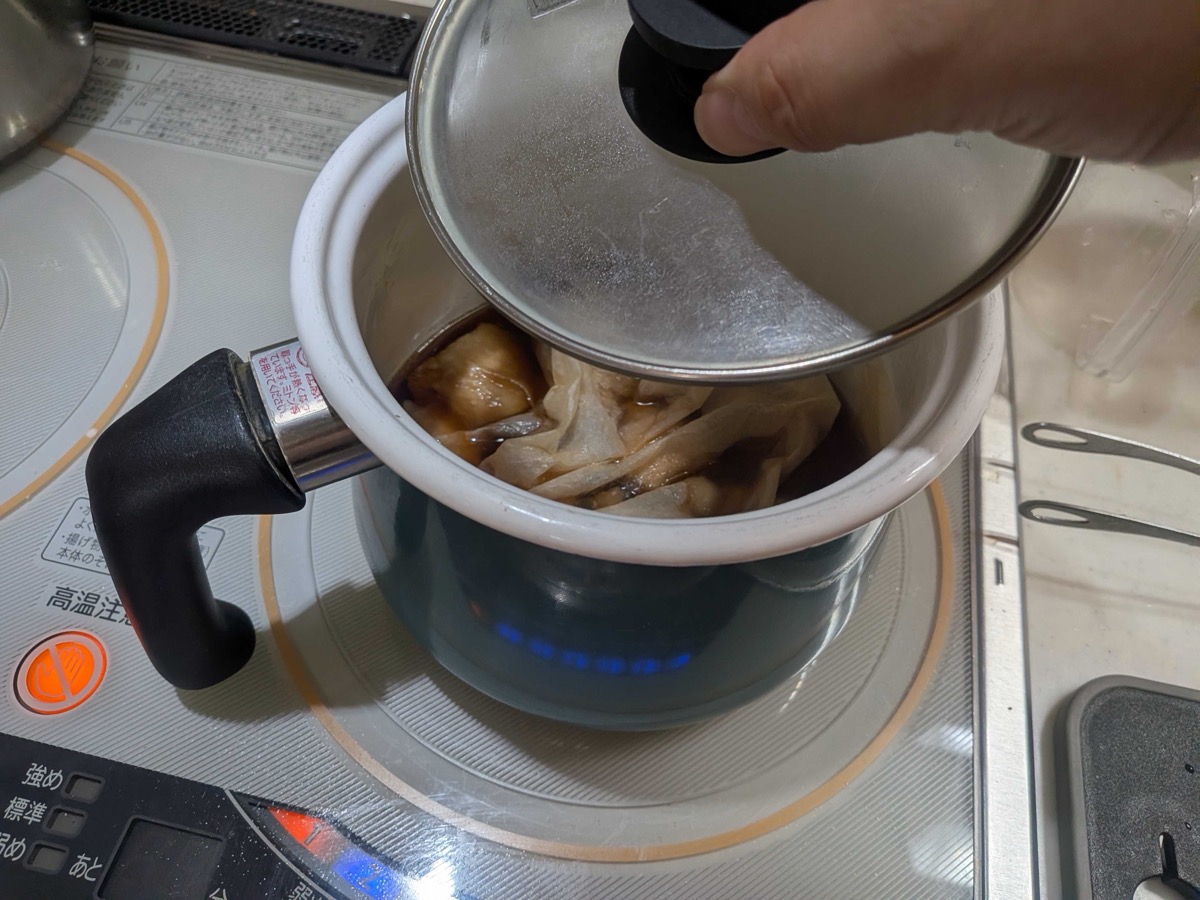
Reduce to a low simmer and cook for 40–50 minutes, turning the pork cubes once or twice during cooking so all sides get equal exposure to the seasoning. The braising liquid should reduce by about half and become glossy and thick enough to coat the back of a spoon.
Step 7: Rest for 20+ Minutes Before Serving
Turn off the heat. Cover the surface with another sheet of clean paper towel (or just the lid). Let the kakuni rest for at least 20 minutes. This resting period is where the seasoning really penetrates into the pork — skipping it means the flavour stays on the surface.
If you have time, refrigerate the whole pot overnight and reheat gently the next day. Kakuni is genuinely better on day two, the same way most braises are. As a bonus, when chilled overnight you can lift off the layer of fat that solidifies on top — a nice option if you want a cleaner finish.
Step 8: Serve (and Add a Soft-Boiled Egg)
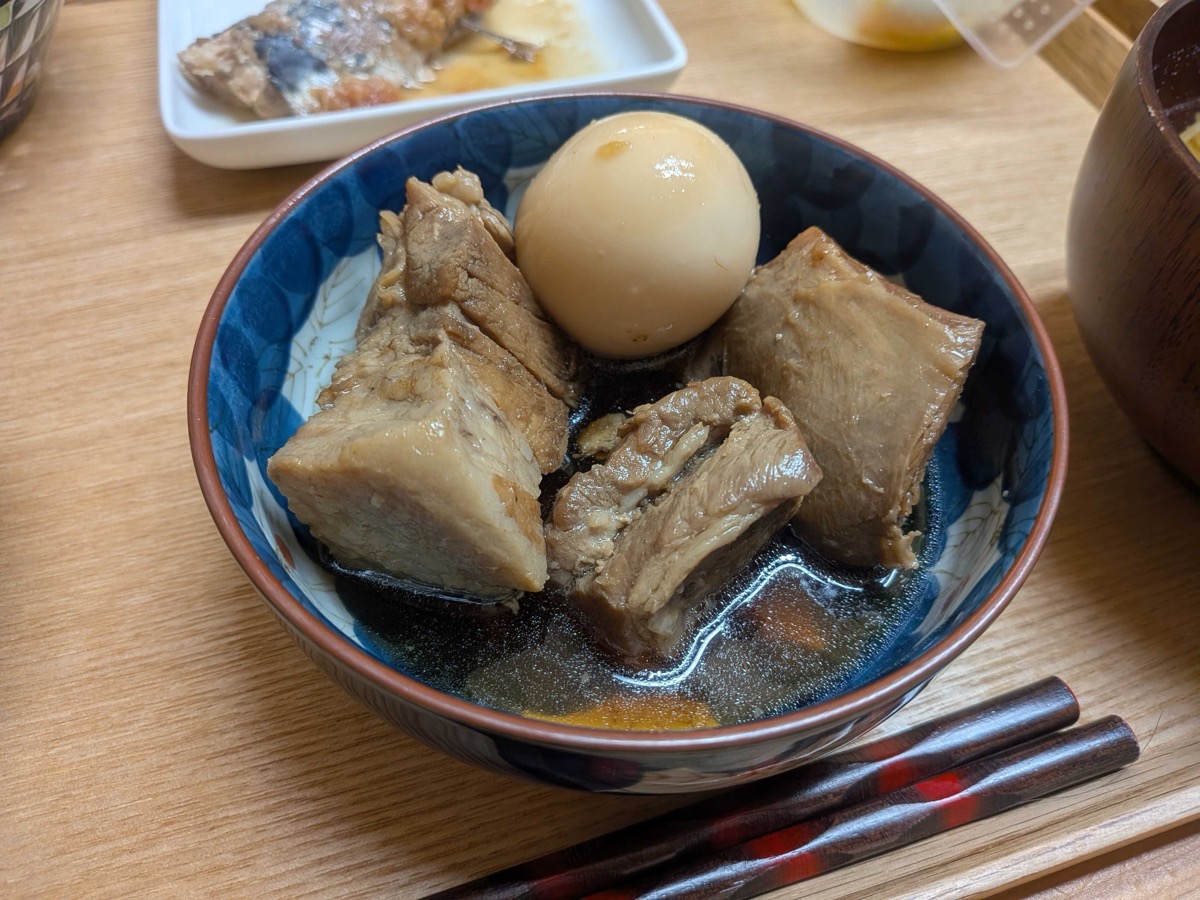
Kakuni is wonderful on its own, but the classic Japanese garnish is a soft-boiled egg braised briefly in the kakuni liquid. The egg picks up colour and savouriness from the sauce and the yolk stays jammy. Make soft-boiled eggs separately (6.5–7 minutes from cold), peel them, and add to the braising pot for the final 5–10 minutes of simmering.
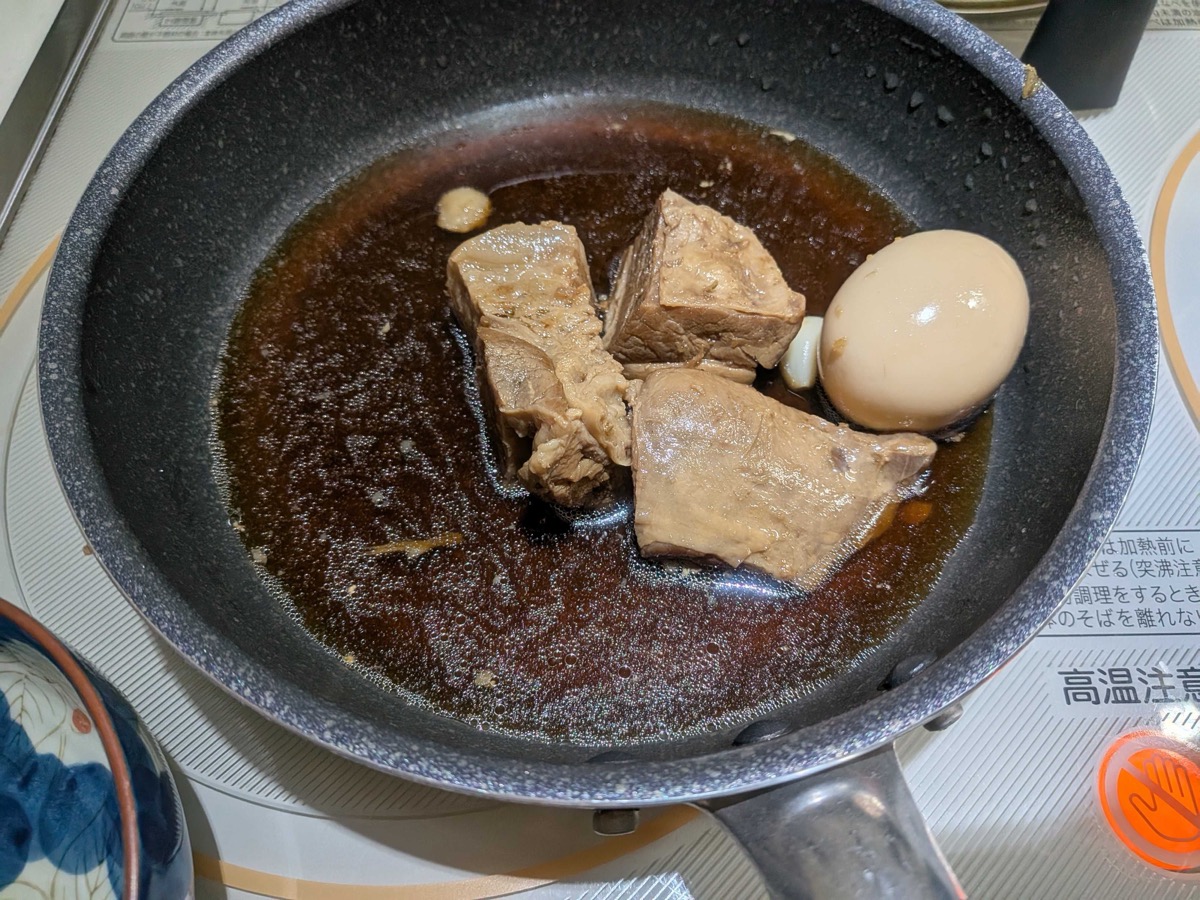
To serve, plate 2–3 cubes per person with a spoonful of the braising liquid and a halved or whole egg. Garnish with shredded raw scallion (shiraga negi) if you have it.
Tips From My Kitchen
- Don’t skip the rice pre-boil. It’s the most important step and what separates Japanese kakuni from anything you’d cook in a regular braise. The milky water carries away the fat and gives a cleaner final flavour.
- Let it rest in the cooking water. The 90-minute “off the heat” rest after pre-boiling is when a lot of tenderisation happens. Don’t try to skip it.
- Use a drop lid. An otoshibuta makes a real difference for even braising and is worth the small investment if you do any nimono (Japanese simmered dishes). Parchment paper works in a pinch.
- Make it ahead. Kakuni is the perfect “weekend cook for the week” dish. It keeps in the fridge for 3–4 days and tastes even better on day 2 or 3.
- Save the braising liquid. The leftover sauce after the kakuni is gone is liquid gold. Strain it and use it to season ramen broth, flavour fried rice, or as a marinade for eggs.
What to Serve With Buta no Kakuni
- Steamed white rice — essential. The rich braising liquid spoons over rice beautifully.
- Miso soup — a light soup balances the richness of the pork.
- A pickled or sharp side — nasu no yakibitashi or a quick cucumber sunomono cuts through the fat.
- Over ramen — kakuni is also classic ramen topping (“chashu kakuni”). Slice the cubes and lay over a bowl of shoyu ramen.
Buta no Kakuni (Japanese Braised Pork Belly)
Ingredients
Method
- Rub the pork belly all over with 2 tbsp soy sauce. Let rest at room temperature for 30–60 minutes — the soy enzymes gently tenderise the meat and add subtle seasoning throughout. Then pat completely dry with paper towels.
- Heat a dry frying pan over medium-high heat. Sear the pork belly fat-side down for 2 minutes, then each other side for 1 minute, until deeply golden brown on all surfaces.
- Transfer the pork to a deep pot. Add 2 litres of water and 5 tbsp uncooked rice. Bring to a boil, then simmer for 60 minutes. Add scallion green at the 30-minute mark. Turn off heat and rest the pork in the cooking water for 90 minutes.
- Lift the pork out, rinse off any sticky residue, and cut into roughly 4cm (1.5 inch) cubes.
- In a clean pot, combine soy sauce, sake, and sugar. Bring to a boil for 1–2 minutes to cook off the alcohol. Add the pork cubes and simmer 4–5 minutes to glaze.
- Add 600ml water, sliced ginger, and peeled garlic. Place a drop lid (otoshibuta) or parchment paper directly on the surface. Simmer for 40–50 minutes, turning the pork once or twice.
- Turn off heat. Cover with paper towel and let rest for at least 20 minutes. For best flavour, refrigerate overnight and reheat the next day.
- If using soft-boiled eggs, peel them and add to the pot during the final 5–10 minutes of simmering. Serve hot with rice, the soy braising liquid, and a soft-boiled egg per person.